Installing Sitejabber App
- From your BigCommerce control panel, click Apps >> Marketplace (bigcommerce.com/apps)
- Search for “Sitejabber”
- Click “Get this app” button
- Install
- Confirm the installation and you’ll be directed to the Sitejabber website to finish the installation.
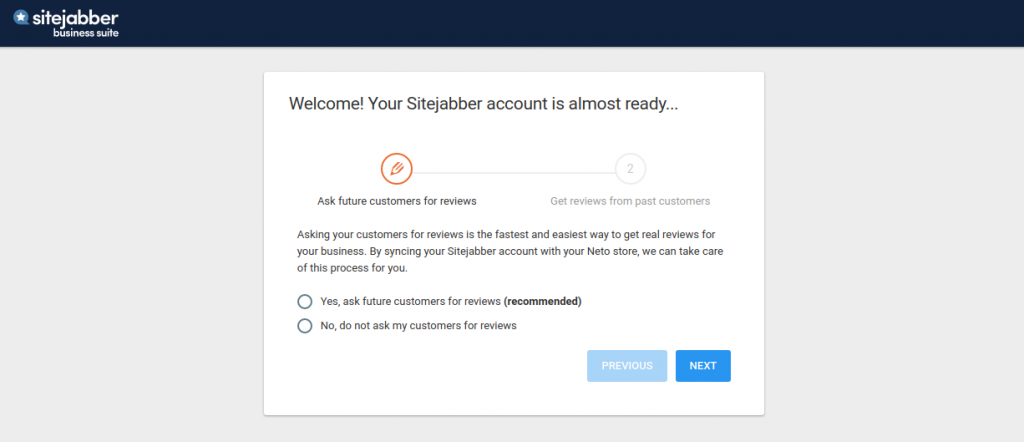
- Specify whether you would like to collect reviews from previous customers. This is an easy way to get a head start on your review collection.
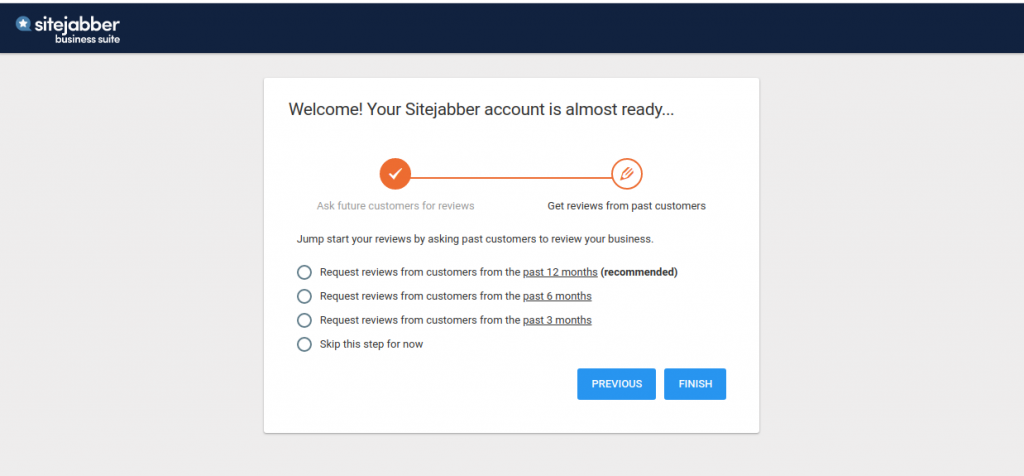
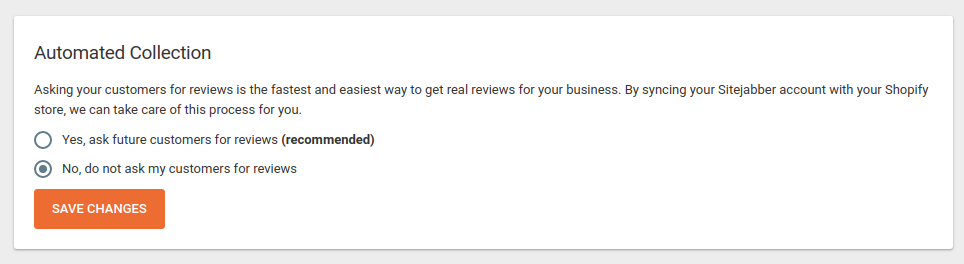
You will be able to change your review collection settings at any time inside the Sitejabber dashboard:
Installing Instant Feedback
- Customize the Instant Feedback Form
- When customization is complete click the “Save & Publish” button
- Click on “Create a Script” button at https://STORE.mybigcommerce.com/manage/script-manager
- Select these options:
- Footer
- Order Confirmation
- Script (Essential)
- Paste the code in “Script contents” section
Without Product Information
Below is an example only:
<script>
    document.querySelector('body').insertAdjacentHTML('beforeend', '<div class="stjr-instant-feedback"></div>');var orderIdA = "%%ORDER_ID%%";var orderIdB = "{{checkout.order.id}}";fetch("/api/storefront/order/" + (!(/ORDER_ID/ig.test(orderIdA)) ? orderIdA : orderIdB),{credentials:"include"}).then(function(response){return response.json();}).then(function(myJson){   document.querySelector("body").addEventListener("STJR.instantFeedbackWidgetLoaded",function(){STJR.setConfig({language: 'en', user: { first_name: myJson.billingAddress.firstName, last_name: myJson.billingAddress.lastName, email: myJson.billingAddress.email }, order_id: myJson.orderId})});
    (function(d,s,id,c){var js,rC=[],uRC=[],r=0;Array.from(document.querySelectorAll('[class*="stjr-"]')).forEach(r=>{rC=[...rC,...Array.from(r.classList).filter((cl)=>{return /^stjr-/.test(cl);})]});uRC=[...new Set(rC)];t=d.getElementsByTagName(s)[0];js=d.createElement(s);js.id=id;js.src='https://www.sitejabber.com/js/v2/{CLIENT-ID}/widgets.js'+(uRC.length ? '?widget-classes=' + uRC.join("|") : '?widget-classes=stjr-base')+'';js.onload=js.onreadystatechange=function(){if(!r&&(!this.readyState||this.readyState[0]=='c')){r=1;c();}};t.parentNode.insertBefore(js,t);}(document,'script','sj-widget',function(){}));
});</script>
Please replace {CLIENT-ID} with the Client ID in your dashboard here.
With Product Information
Below is an example only:
<script>
    document.querySelector('body').insertAdjacentHTML('beforeend', '<div class="stjr-instant-feedback"></div>');var orderIdA = "%%ORDER_ID%%";var orderIdB = "{{checkout.order.id}}";fetch("/api/storefront/order/" + (!(/ORDER_ID/ig.test(orderIdA)) ? orderIdA : orderIdB),{credentials:"include"}).then(function(response){return response.json();}).then(function(myJson){

        document.querySelector("body").addEventListener("STJR.instantFeedbackWidgetLoaded",function(){var products=[],lineItems=[].concat(myJson.lineItems.digitalItems,myJson.lineItems.giftCertificates,myJson.lineItems.physicalItems);for(var i=0;i<lineItems.length;i++)products.push({currency:myJson.currency.code,images:lineItems[i].imageUrl,price:lineItems[i].listPrice,product_link:lineItems[i].url,sku:lineItems[i].sku,item_group:lineItems[i].productId,title:lineItems[i].name});STJR.setConfig({language:'en',user:{first_name:myJson.billingAddress.firstName,last_name:myJson.billingAddress.lastName,email:myJson.billingAddress.email,phone:myJson.billingAddress.phone},products:products,order_id:myJson.orderId})});

        (function(d,s,id,c){var js,rC=[],uRC=[],r=0;Array.from(document.querySelectorAll('[class*="stjr-"]')).forEach(r=>{rC=[...rC,...Array.from(r.classList).filter((cl)=>{return /^stjr-/.test(cl);})]});uRC=[...new Set(rC)];t=d.getElementsByTagName(s)[0];js=d.createElement(s);js.id=id;js.src='https://www.sitejabber.com/js/v2/{CLIENT-ID}/widgets.js'+(uRC.length ? '?widget-classes=' + uRC.join("|") : '?widget-classes=stjr-base')+'';js.onload=js.onreadystatechange=function(){if(!r&&(!this.readyState||this.readyState[0]=='c')){r=1;c();}};t.parentNode.insertBefore(js,t);}(document,'script','sj-widget',function(){}));

    });
</script>
Please replace {CLIENT-ID} with the Client ID in your dashboard here.
Installing Product Widgets
From your BigCommerce Dashboard
- Login as an admin
- Navigate to “Storefront”
- Go to “Themes”
- Select “Advanced dropdown” on the active theme and then “Edit Theme Files”
Script Loader:
Placement location:
- Go to Storefront
- Then go to Script Manager (eg – https://store.mybigcommerce.com/manage/script-manager)
- Create Script with the below options
- Name of script – Sitejabber Widget Loader
- Location on page – Footer
- Select pages where script will be added – Store pages
- Script category – Functional
- Script type – Script
- Script contents – below code snippet
<script>(function(d,s,id,c){var js,rC=[],uRC=[],r=0;Array.from(document.querySelectorAll('[class*="stjr-"]')).forEach(r=>{rC=[...rC,...Array.from(r.classList).filter((cl)=>{return /^stjr-/.test(cl);})]});uRC=[...new Set(rC)];t=d.getElementsByTagName(s)[0];js=d.createElement(s);js.id=id;js.src='https://www.sitejabber.com/js/v2/{CLIENT-ID}/widgets.js'+(uRC.length ? '?widget-classes=' + uRC.join("|") : '?widget-classes=stjr-base')+'';js.onload=js.onreadystatechange=function(){if(!r&&(!this.readyState||this.readyState[0]=='c')){r=1;c();}};t.parentNode.insertBefore(js,t);}(document,'script','sj-widget',function(){}));</script>Please replace {CLIENT-ID} with the Client ID in your dashboard here.
Adding Product JSON to Product Pages (Single SKU)
- Go to “Theme file editor”
- Then go to templates/components/products/product-view > product-view.html
<script type="application/json" id="ProductJson-{{#if product.sku}}{{product.sku}}{{else}}{{product.id}}{{/if}}">
    {
        "title": {{{JSONstringify product.title}}},
        {{#if product.id}}"id": "{{product.id}}",{{/if}}
        {{#if product.sku}}"sku": "{{product.sku}}",{{/if}}
        {{#if product.options}}{{#if product.sku}}"item_group": "{{{first (split product.sku "-")}}}",{{/if}}{{/if}}
        {{#if product.mpn}}"mpn": "{{product.mpn}}",{{/if}}
        {{#if product.gtin}}"gtin{{length product.gtin}}": "{{product.gtin}}",{{/if}}
        "url" : "{{product.url}}",
        "description": "{{encodeURI (sanitize product.description)}}",
        "price": "{{#if product.price.with_tax}}{{product.price.with_tax.value}}{{else}}{{product.price.without_tax.value}}{{/if}}",
        {{#if product.brand}}
        "brand": {
            "@type": "Brand",
            "url": "{{product.brand.url}}",
            "name": {{{JSONstringify product.brand.name}}}
        },
        {{/if}}
        "images": ["{{getImage product.main_image 'zoom_size' (cdn theme_settings.default_image_product)}}"]
    }
</script>
Adding Product JSON to Product Pages (Multiple Variant SKUs)
- Go to “Theme file editor”
- Then go to templates/components/products/product-view > product-view.html
<script id="ProductJson-product-template" type="application/json">
	{
		"id": "{{product.id}}",
		"title": "{{product.title}}",
		"gtin": "{{product.gtin}}",
        "mpn": "{{product.mpn}}",
		"brand": "{{product.brand.name}}",
		"tags":{{{JSONstringify product.category}}},
		"price": "{{#if product.price.with_tax}}{{product.price.with_tax.value}}{{else}}{{product.price.without_tax.value}}{{/if}}",
		"variants": [{
				"sku": "{{#if product.sku}}{{product.sku}}{{else}}{{product.id}}{{/if}}",
				"title": "{{product.title}}",
				"price": "{{#if product.price.with_tax}}{{product.price.with_tax.value}}{{else}}{{product.price.without_tax.value}}{{/if}}",
				"images": ["{{getImage product.main_image 'product_size' (cdn theme_settings.default_image_product)}}"],
				"product_link": "{{product.url}}"
			},
			{
				"sku": "{{product.id}}",
				"title": "{{product.title}}",
				"price": "{{#if product.price.with_tax}}{{product.price.with_tax.value}}{{else}}{{product.price.without_tax.value}}{{/if}}",
				"images": ["{{getImage product.main_image 'product_size' (cdn theme_settings.default_image_product)}}"],
				"product_link": "{{product.url}}"
			}
		]
	}
</script>
Adding Product Rating Widget

Note: Theme locations below may vary
Placement location for main product / product card:
- Go to “Theme file editor”
- Then go to templates/components/products/product-view > ratings.html
- Paste code snippet below under the Product Price or Product Title section
<div class="stjr-product-rating" data-product-id="{{#if product.sku }}{{ product.sku }}{{else}}{{ product.id }}{{/if}}"></div>Adding Product Review Widget
- Go to “Theme file editor”
- Then go to templates/components/products/product-view > product-view.html
- Paste the code snippet below under the product description
<div class="stjr-product-review-page" data-product-id="{{#if product.sku }}{{ product.sku }}{{else}}{{ product.id }}{{/if}}"></div>